
Get ready to infuse your holiday season with creativity, togetherness, and a touch of DIY magic! Our collection of Christmas craft projects is designed for families to enjoy, bringing generations closer as you create festive decorations and cherished memories. Whether you’re working with little ones or a group of all ages, these family-friendly crafts are perfect for bonding over the holiday spirit.
Surf Wagon Ornament
Materials
- Scissors and glue
- Thin ribbon or twine
- Decorations such as stickers, buttons, & pipe cleaners
- Red, green, & white cardstock, construction and/or felt paper
- Holiday Surf Wagon Template


Instructions
- Download and print the template and cut out the stencils.
- Using the stencil pieces, cut out the different shapes from cardstock or construction paper.
- Optional: Cut all of the pieces out again using felt, and glue them on top of the paper shapes for a sturdier ornament.
- Glue the windows, wheels, and headlight pieces onto the surf wagon.
- Now glue the surf board on the top of the surf wagon at a slight angle.
- Decorate your ornament as you wish! We used holiday embellishments from Ben Franklin Crafts, ribbon, and pipe cleaners.
- To hang your craft on the tree, cut out a 6 inch piece of thin ribbon or twine, fold it in half, and glue the ends onto the back.
Tips
- The printable template is scalable for any size ornament.
- Use paperclips for easier stencil cutting.
- Cut out faces from photos and stick them on the windows!

Origami Poinsettia Wreath
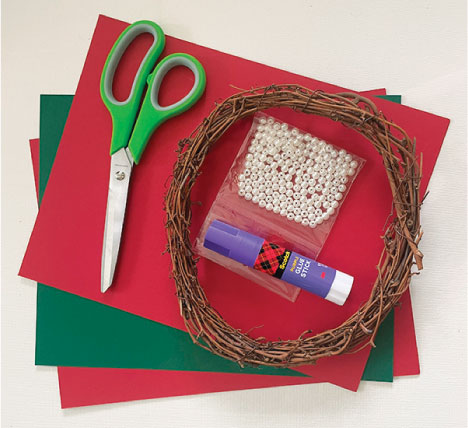
Materials
- Round wreath base
- Scissors, glue and ruler
- Pearl or yellow beads
- Crafting wire or needle and thread (optional)
- Red and green crafting paper
Instructions
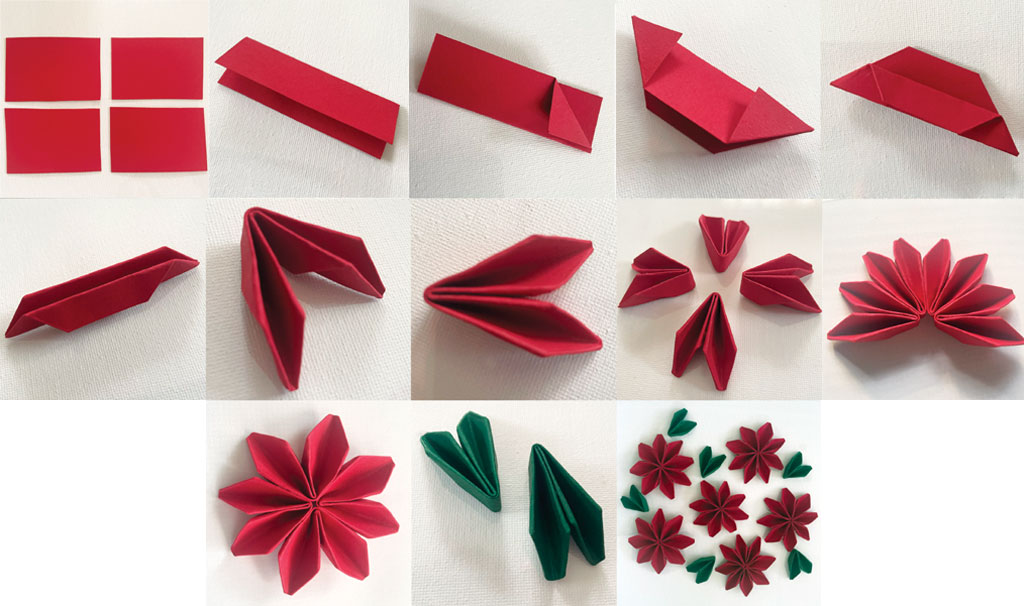
- Using red paper, cut out four rectangle pieces, 2″x 3″. For larger flowers, cut larger rectangles.
- Take one of the rectangle pieces and fold it in half.
- Fold any one of the corners diagonally, aligning the shorter end with the longer folded side.
- Similarly fold the remaining three corners.
- Fold one side in half, towards the outer side.
- Similarly fold the other side.
- Fold entire piece in half down the center. Fluff the petals out using your fingers.
- Apply glue between the last fold and hold until secure. This makes two of the eight petals.
- Using the three other rectangle red papers, prepare the rest of the six petals.
- Apply glue on the outer side of the folded papers and join each piece side by side. “Glue should be completely dry before moving on to the next step.
- Apply glue to join the first and last folded papers to form the flower pattern.
- Use green craft paper to craft the leaves, using the same technique as the flower petals.
- Craft more flowers to cover the entire wreath base.
- Glue the flowers onto the wreath base.
- Glue the green leaves between the flowers. Now glue the beads to the center of each flower to complete your wreath craft!
Tips
- To cover an 8″ wreath base, you will want to make at least 9 flowers.
- If you don’t have origami paper or cardstock, cut pieces from gift wrapping or construction paper.
- For more secure flowers, older kids and adults can use crafting wire or a needle and thread instead of glue.
- Origami works best by strongly creasing each fold before moving on to the next step.